Category: Uncategorized

World Championship Cheese Contest Featured on CBS Sunday Morning

   |   By  |  No comments

We are proud of the work we do for the Wisconsin Cheese Makers Association (WCMA). WCMA has hosted the world’s largest technical cheese and dairy competition for several decades. Amplitude Design, Inc. developed a web based application for the contest, including e-commerce for online entry, a scoring application with 11 scoresheets translated into 5 languages and operations/fulfillment for use during the contest.

We were elated to see Martha Teichner from CBS Sunday Morning attending with her camera crew. We are long time viewers of the show, and she did a fantastic tribute to the contest.

We have worked with WCMA and the World Championship Cheese Contest for 10 years, and the growth of the contest is due in part to the technology we provide.

Enjoy the segment from the show.

Send Mail Using msmtp & sendmail With PHP’s mail() Function with Rackspace Hosted Email on a Ubuntu Server

   |   By  |  No comments

This post is a way for me to jog my memory when I need to setup PHP’s mail function to use SMTP. This method requires sendmail, msmtp and a Ubuntu server. Most likely, sendmail is installed by default on Ubuntu. I won’t go into installing sendmail, though it is pretty straightforward. The approach is very similar under other Linux distros too.

Also, in this example the password is not encrytped, though others have recommended this approach. See, “passwordeval”, which can be used to obtain the password from the output of an an executable.

1. Install msmtp

sudo apt-get install msmtp

2. Configure msmtp

  • Create a file in your user directory ~/ named .msmtprc

3. Update the contents of .msmtprc

Replace instances of <...> with your pertinent values.

# Set defaults.
defaults

# Enable or disable TLS/SSL encryption.
auth on
tls on
tls_starttls off
tls_certcheck on
tls_trust_file /etc/ssl/certs/ca-certificates.crt

# Set up a default account's settings.
account default
add_missing_from_header on
logfile ~/.msmtp.log
host "secure.emailsrvr.com"
port 465
domain "<domain.com>"
maildomain "<domain.com>"
user <user@domain.com>
password "<password>"
from "<user@domain.com>"

4. Make sure the permissions are set on the .msmtprc file.

chmod 600 .msmtprc

The .msmtprc file should be owned by the user that the web server is running under, www-data for example.

You can also setup a default configuration file at /etc/msmtprc. This file should also be chmod 600, and likely owned by root.

5. Test the msmtp settings

# Replace user@domain.com with the email recipients email address for testing.
echo -e "Subject: Testing" | msmtp --debug -t user@domain.com

6. Update PHP’s php.ini settings

  • sendmail_path = “/usr/bin/msmtp -t”

7. Test Using PHP mail()

<?php
// The message
$message = "Line 1\r\nLine 2\r\nLine 3";

// In case any of our lines are larger than 70 characters, we should use wordwrap()
$message = wordwrap($message, 70, "\r\n");

// Send - replace email@domain.com with the recipient address
$bool = mail('email@domain.com', 'Here Is What I Wanted to Send', $message);

var_dump($bool);

New Server Checklist for Digital Ocean (6CPU, 16gb, SSD, New York)

   |   By  |  No comments

JMeter Testing the Server

jmeter for stress testing the connections (requires java jdk @ https://www.oracle.com/technetwork/java/javase/downloads/jdk8-downloads-2133151.html).

SlowLoris and Slow Body Attacks

slowhttptest @https://github.com/shekyan/slowhttptest install using “pip install slowhttptest”

slowhttptest -c 1000 -H -g -o my_header_stats -i 10 -r 200 -t GET -u https://www.siteurl.com -x 24 -p 3

Wapiti for App Owasp Testing

*Requires Python 3 for app testing.

Download the distribution and unzip. CD into the directory. Then run ./wapiti -u https://www.siteurl.com/ -v 1 -d 2….

Counting/Viewing Connections

All Connections
netstat -nalt | grep :443

Open Connections
netstat -nalt | grep :80 | grep ESTA

Count Open Connections
netstat -nalt | grep :80 | grep ESTA -c

Find Number of Processors

grep processor /proc/cpuinfo | wc -l

Find the number of open files allowed by ulimit: ulimit -a

max clients = worker_processes * worker_connections (* =multiply) and worker_processes = number of processors

Actually with reverse proxy: max_clients = (worker_processes * worker_connections ) / (X * 2) where X is however many concurrent connections these clients make to you.

*A single process can open as may connection as the ulimits allow. num_workers * max_connections is the formula but outside loadbalancer/proxy max connections and ulimits need to be taken into account for a reasonable values. Setting max_connection to a really high value may backfire as ulimits will be a limiting factor.

Resources

Slowloris DoS Attack and Mitigation on NGINX Web Server


https://fralef.me/nginx-hardening-some-good-security-practices.html

Fine tuning Nginx

Adjust worker_connections 100000; and worker_processes 6; See the resource links for more information.

In /etc/nginx/nginx.conf


http {
...
        # Optimize and prevent slow body/header slowloris attacks.
        # limit the number of connections per single IP. 10m is a queue of 10000
        limit_conn_zone $binary_remote_addr zone=conn_limit_per_ip:10m;
        # limit the number of requests for a given session. 10m is a queue of 10000
        limit_req_zone $binary_remote_addr zone=req_limit_per_ip:10m rate=25r/s;
        client_body_buffer_size 10K;
        client_header_buffer_size 1K;
        client_max_body_size 22m;
        large_client_header_buffers 2 1k;
        client_header_timeout 12s;
        client_body_timeout 12s;
        send_timeout 10s;
...
}

Then in sites-available/siteurl.conf Virtual Hosts config


server {
...
       server_name siturl.com www.siteurl.com;

       root /var/www/default/htdocs;
       index index.php index.html;

        # conn_limit_per_ip is set in nginx.conf
        limit_conn conn_limit_per_ip 10;
        limit_req zone=req_limit_per_ip burst=40 nodelay;
...
}

Connecting to MySQL Remotely Using AutoSSH and SSH Tunneling

   |   By  |  No comments

This is the second part of an evaluation into connecting to MySQL remotely and securely. There are some helpful links in my first post referencing speed over SSL versus ssh tunneling. TLDR; tunneling is far more efficient then MySQL over SSL. Part 1: Examples of Remote MySQL SSL Connections Using PHP: MySQLi and PDO

The intent of this post is to jog my memory, share my process, and offer some helpful code snippets and resources.

THE QUOTATION MARKS IN THIS DOCUMENT WILL BREAK THESE COMMANDS ON THE COMMAND LINE

This post assumes you have an understanding of ssh-keygen and setting up passwordless SSH access to your MySQL remote server. See here for a good post on getting this setup: Digital Ocean

This post also assumes you have autossh setup on the server that will have remote client access to the MySQL server. Here is a good post on how to install autossh: http://ask.xmodulo.com/install-autossh-linux.html

I would also recommend creating a script to run the command at boot time. This would prevent a loss of connection in the event of a server reboot.

MY USE CASE

I am using this as a means to query my database from another server. This database connection is not used for production, and I would recommend against using it in this way. The connection tunnel cannot accommodate the typical production needs of a database connection. Proximity between the servers has a large effect on the latency when querying too.

THE IMPLEMENTATION

Here is a layout for these who like to visualize what the setup.

Remote MySQL Connection Using authssh and tunneling.

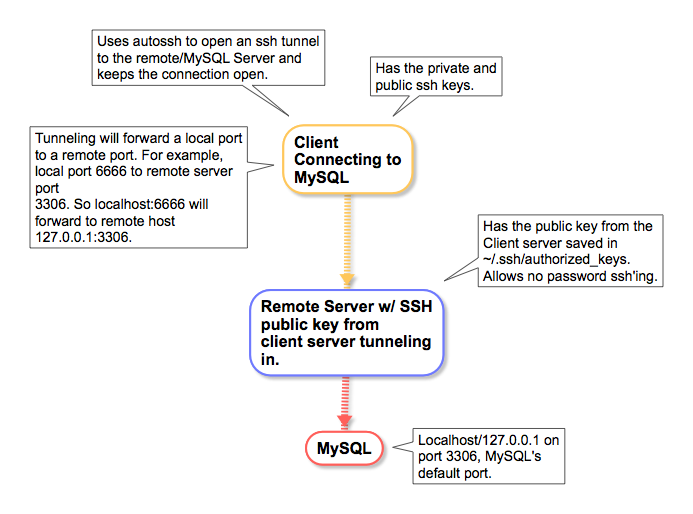
FIRST – SSH TUNNEL SETUP


# Setup the ssh tunnel w/o autossh
ssh -N <server name from ~/.ssh/config > -L 6666:localhost:3306


# Example using the connection (on Mac using MySQL shell client)
mysqlsh -u<user> -p "<password>" -P 6666 -h127.0.0.1 --sql --nw

SECOND – AUTOSSH TUNNEL SETUP


# DEBUGGING - YOU SHOULD SEE autossh sending a request every ServerAliveInterval seconds.
AUTOSSH_DEBUG=1 autossh -M 0 -N <server name from ~/.ssh/config > -o "ServerAliveInterval 10" -o "ServerAliveCountMax 3" -L 6666:localhost:3306 -vvv


# For testing without debugging information
autossh -M 0 -N <server name from ~/.ssh/config > -o "ServerAliveInterval 10" -o "ServerAliveCountMax 3" -L 6666:localhost:3306


# Once the connection is validated add the -f flag to have it run in the background.
autossh -f -M 0 -N <server name from ~/.ssh/config > -o "ServerAliveInterval 10" -o "ServerAliveCountMax 3" -L 6666:localhost:3306


# Enable compression using the -C flag.
autossh -f -M 0 -N <server name from ~/.ssh/config > -o "ServerAliveInterval 10" -o "ServerAliveCountMax 3" -C -L 6666:localhost:3306


# Limit to ipv4 or ipv6 using -4 or -6 respectively.
autossh -f -M 0 -N <server name from ~/.ssh/config > -o "ServerAliveInterval 10" -o "ServerAliveCountMax 3" -4 -L 6666:localhost:3306

# Killing the autossh process
ps aux | grep ssh

ps aux | grep autossh

Kill the ssh process that autossh created. Autossh will recognize that you have killed the process and end its process too.


# Testing on server
autossh -M 0 -N <server name from ~/.ssh/config > -o "ServerAliveInterval 10” -o "ServerAliveCountMax 3” -L 6666:localhost:3306

– Uses mysql shell on Mac

mysqlsh -u<mysql user> -p -h 127.0.0.1 -P 6666

Sample PHP Connection


<?php

$link = mysqli_connect("localhost:<tunnel port 6666>", "my_user", "my_password", "my_db");

if (!$link) {
echo "Error: Unable to connect to MySQL." . PHP_EOL;
echo "Debugging errno: " . mysqli_connect_errno() . PHP_EOL;
echo "Debugging error: " . mysqli_connect_error() . PHP_EOL;
exit;
}

echo "Success: A proper connection to MySQL was made! The my_db database is great." . PHP_EOL;
echo "Host information: " . mysqli_get_host_info($link) . PHP_EOL;

mysqli_close($link);

Comments and Information from the Man Page:

ServerAliveCountMax
Sets the number of server alive messages (see below) which may be
sent without ssh(1) receiving any messages back from the server.
If this threshold is reached while server alive messages are
being sent, ssh will disconnect from the server, terminating the
session. It is important to note that the use of server alive
messages is very different from TCPKeepAlive (below). The server
alive messages are sent through the encrypted channel and there‐
fore will not be spoofable. The TCP keepalive option enabled by
TCPKeepAlive is spoofable. The server alive mechanism is valu‐
able when the client or server depend on knowing when a connec‐
tion has become inactive.

The default value is 3. If, for example, ServerAliveInterval
(see below) is set to 15 and ServerAliveCountMax is left at the
default, if the server becomes unresponsive, ssh will disconnect
after approximately 45 seconds. This option applies to protocol
version 2 only.

ServerAliveInterval
Sets a timeout interval in seconds after which if no data has
been received from the server, ssh(1) will send a message through
the encrypted channel to request a response from the server. The
default is 0, indicating that these messages will not be sent to
the server. This option applies to protocol version 2 only.

Simple PHP Dependency Injection with Interfaces Example

   |   By  |  No comments

I created this graphic as a simple way to visualize dependency injection, unit testing and the use of php interfaces. The interface provides the “agreement/contract” between the implementations and  class \ControllerForExample. You can see that $httpClient can be any one of the implementations. \ControllerForExample doesn’t need to know the details of each implementation, only that the contract/implementation is valid.

View Full Size Graphic
php dependency injection and interfaces